This is all new to me; joinery. More accurate carpentry than I've been doing so far as I move to the fitout of the kitchen and other areas. In fact this is my very first ever mortise and tenon joint:
I worked out how to do it from reading some old books and thinking it through carefully. And while not absolutely perfect, the two fit together very well
This was the first step in making a panel for the end of one of the kitchen benches, one of two walls eitherside of the under-bench fridge. So another mortise and tenon joint and a couple of simpler lap joints later and this is what I had:
Installation was straight foward. I drilled some dowels into the bottom that insert into holes in the floor plate and the whole thing is kept vertical by an angle bracket at the back.
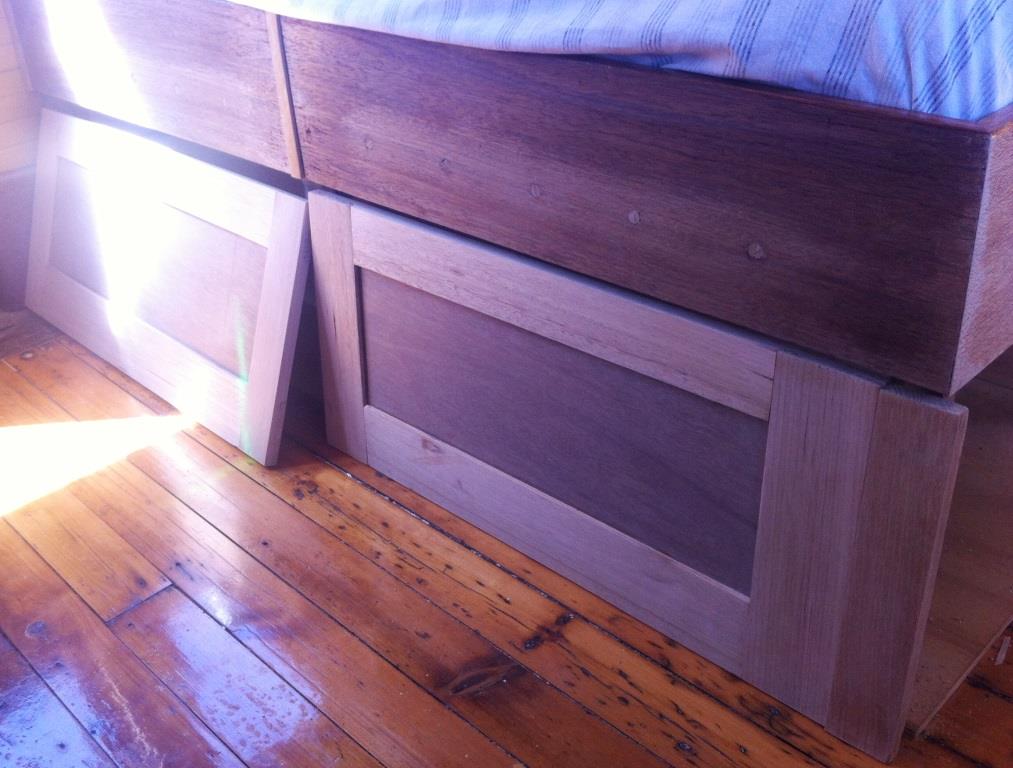
And while in the mood for fixing bits, I also fixed one of the end panels under the bed from my last blog entry. Further this all got it's first coat of varnish and is starting to look finished.
Back at home and the second kitchen panel, the one that will go the other side of the fridge space, is completed and ready to take out to the carriage for fitting next weekend. Being a long weekend for Easter I'll be staying out there a couple of nights with Chester and getting a lot done, including some more work outside the carriage now that the temperatures have calmed down from a scorching summer.
Restoring an old Queensland Railway carriage and collecting memorabilia from Queensland Rail to finish the job. The carriage is number 1072, an Evan's Car used in Brisbane suburban services from 1924 through to 1990. Your thoughts, contributions and comments are welcome!
Sunday, March 24, 2013
Sunday, March 17, 2013
Internal details
It's now getting to the stage where I can make small bits at home and take them to the carriage to mount. These two panels are a good case in point. They are Tassie Oak frames with simple lap-joints on the corners and the centre is 6mm Marine Ply rebated into the frame. I knocked these up at home over the last long weekend and then spent some time this weekend fitting them into place. Not that this is their final configuration! The panel on the right will be fixed pretty much where it is but the one on the left will be the front of a draw under the bed at that location.
Then there was a simple shelf up high over the bed head. The brackets are from under the original seats and have 'QR' forged into them. Very heavy duty but decorative! The shelf itself is a solid piece of Silky Oak cut to shape. This was a really daggy old bit of timber before I spent some time sanding it back to clean wood. It is also slightly warped but I think that adds character! I've bolted it in place temporarily to try and pull it back to a flatter piece before I take it off again to varnish it.
Finally I started work on the kitchen area. This is where the small under-counter fridge will be. I'm making up two more heavy duty panels to go either side and become part of the framing for the whole kitchen area. I'm making these frames out of Silky Oak because they will be varnished rather than painted and will help to look more authentic in this high-visibility area.
![]() |
| Two panels at the end of the bed |
![]() |
| A small bookshelf high over the bed head |
![]() |
| The area where the fridge will be |
Tuesday, March 12, 2013
Finishing the bed
Putting the fininshing touches to the bed, not last weekend, but the weekend before. First step was to install slats made of red gum decking strips. What you can't see here is a central support of angle iron running the length of the bed down the middle. This is supported at either end and with two posts along its length. All up a very sturdy bed! And that's my wife Abbie giving it a test!
Then it's only a case of putting the mattress back on and making the bed (then giving over to my 7yo son Chester for yet more testing!).
Sunday, February 24, 2013
Finishing the Bedroom
Yesterday it got to 40C out at St Kilda and was not good for working. However, in the few hours that we were out there, I managed to tidy up some paint work, clean up the drop sheets etc, and rehang the luggage racks. Now it's starting to look like an inviting and comfortable place!
Next job is to finish off the bed. I started sanding back the outside ready for more coats of varnish - that was hot and sweaty work!
![]() |
| Looking west to the original end wall |
Next job is to finish off the bed. I started sanding back the outside ready for more coats of varnish - that was hot and sweaty work!
![]() |
| Looking east to the bathroom bulkhead |
Sunday, February 10, 2013
Restoring the Ceiling
The original pressed tin ceilings of Clarabelle are all in pretty good condition but dirty. Very dirty! And paint encrusted in places. So restoring the ceilings is a straight forward but time-consuming job.
![]() |
| Before and After |
This first pic shows a before and after effect. All I’ve
done is wash the surfaces with sugar soap and then paint the left side with a
white gloss acrylic. It needs a second coat but I think you can see that the effect
of just one coat is pretty dramatic.
Next, two photos showing close ups before and after of
filling and painting. In many places there were intermittent gaps between the
pressed tin and the wooden mouldings that hold them in place. These are prototypical
– it was how they were originally – but unsightly and easily remedied with some
white sealant and a coat of paint. Both the sealant and paint are acrylic and
work well together; just squirt the sealant into the gap and, when you go over
it with paint, the two mix to smooth out and seamlessly fill the joint.
![]() |
| Details before |
![]() |
| Details after |
The encrusted paint is only really a problem in some details
of the mouldings and is easily removed with a chisel, sanded back and painted.
Being a tall guy, I can do all this without ladders but boy
is my neck playing up today!
Monday, January 28, 2013
Working in the Bedroom
More work in the main bedroom over the Australia Day long
weekend. That means more painting, particularly the ceilings which are coming
up nicely. And painting the base for one of the light fittings meant that I
could put one of the original lights back in place. There were originally 9 of
these in Clarabelle but when I got here all but one had been removed. So far I’ve
managed to find four replacements on Ebay and this is one of them.
![]() |
| Ceiling painted, light fitting fitted |
Then there was the beginnings of the bed. The sides are the
last of a load of recycled timbers that Bob, a friend of Abbie's, bequeathed to
the project after moving to Scotland. These were the sides of a book
case and I originally thought they were both Maple but, on cleaning them up,
the shorter length is some other timber (I don’t know what). These were pre-cut
and routed out to accept thin strips of Tassie Oak to cover nail holes. I also
routed the back to let in the supporting timbers. I then took the sides home
and varnished them through the week before bringing them back out and
installing them as you can see here. Thanks to my mate Ben who was on hand to
help with the swearing and profanity that saw this job to completion!
![]() |
| The beginnings of the bed |
Sunday, January 6, 2013
The Xmas Break
Over the Xmas-New Year break I was able to get some more
work done on Clarabelle assisted by my wife Abbie and my Dad and his wife Thi,
who came over for a visit from Sydney. Being generally hot and too
uncomfortable to work on the outside (not to mention dangerous – that Sun was
lethal!), we focussed our attentions on the inside. Specifically we spent a lot
of time and effort bringing the main bedroom into line.
![]() |
| The bathroom bulkhead showing new yellow walls and new white gloss on the ceiling |
First order of the day was to strip out all that we could,
including the luggage racks, shelving brackets and rub rails. We even went to
the lengths of removing the end seat for better access to the walls. Then there
was a bit of carpentry to be done completing the frames around the working
droplights. Lots of bogging to fill holes and gaps which then required lots of
sanding. I installed a dust barrier between the main cabin and the main bedroom
using a disposable drop sheet and loads of masking tape. Flimsy but effective –
despite being blown around a fair bit by the slightest breeze, it did a pretty
good job of keeping the sanding dust out of the main cabin.
![]() |
| The northern wall with new paint after stripping out rubrails, luggage racks and even the end seat. The end (western) wall will be left in original condition. |
Then it was a good clean up and vacuum around before
painting. Initially we started with brushes but dad suggested that we paint the
yellow with the spray gun for a better finish. This meant many hours masking up
areas where we didn’t want to paint yellow until we ran out of masking tape.
This does mean some overspray issues but nothing that can’t be sorted with a
brush of the appropriate colour. And, at the end of the day, we got a good
depth of solid colour in this problematic and thin paint. So all those hours
masking up were probably worth it!
![]() |
| The bedroom door. worth comparing to a similar shot from a previous post. |
More painting is required before I start putting the room
back together again and installing the bed but this is all brush work. You can
see that I’ve started painting the ceiling in a white gloss – pain of a job but
I think it looks all the better for the effort.
Subscribe to:
Posts (Atom)